Hello everyone, this is an article about my ZenLibrary program aimed at those programmers who wish to either extend it or just know more about what’s going on behind the scenes. If you’re just interested in obtaining the program, click here.
I’ve *attempted* to make it easy for any programmer to extend the rules in ZenLibrary. Since I’m releasing this tutorial at roughly the same time as the actual program, I haven’t actually had a chance to get any feedback on how I might improve the extensibility interface. I do, however, want to make it clear I have no interest in making an elaborate end-user based rule scripting engine. Doing so would a.) screw up the simplicity of the program and b.) drastically change the scope of this software. Throwing in some user-defined regular expressions is about as far as I am willing to go.
Part 0 – Getting Set Up and Getting The Source
Creating new rules in ZenLibrary does NOT require getting the source code. One simply needs to reference “ZenLibrary.RuleBase.dll” that comes with the program (version 0.3 and later). However, I think having the source on hand will make debugging things a bit easier on your part. But, it’s all your call.
This project was done in C#, using WPF, and in Visual Studio 2008. Hopefully none of that made you too uncomfortable. You’ll pretty much need Visual Studio 2008 to deal with this solution. I suppose the Express edition of C# could work, but I haven’t tried it.
The source code is controlled in subversion. Everyone has read permissions on the repository. If you’d like to contribute to the project and need write access, drop me a line. This is an open source project, released using the LGPL.
ZenLibrary SVN Host: https://www.inchoatethoughts.com/zenlibrarysvnPart 1 – How It Works
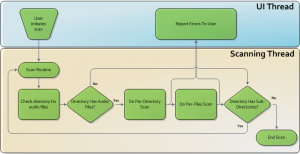
Before we get into how to add our own rules, let’s talk a bit about how this program runs. First, the user chooses a directory to scan through and the rules he wants to test against, and then he presses start. The program now launches a new thread (as to not stall the user interface thread) and begins to scan each directory. This is where our first set of tests begins to run. There are two different types of tests, or “rules” (I’ll be using the terms interchangeably). There are “per-directory” rules. These rules run on any directory with music files. These sorts of rules are useful for doing things like checking for the existence of a particular image file (e.g. album artwork) inside the directory. After the “per-directory” tests run, a set of “per-file” tests will be run against each of the MP3 files in the directory. The “per-files” are useful for checking the content of specific tags, checking for proper file name, etc.
Forgive the terrible flowchart. Continuing on. This is a .NET program, so anyone extending this software will have the full .NET library at their disposal, which is pretty powerful in and of itself. However, since this is an audio library scanner, the program also makes use of TagLib#. TagLib, for those who aren’t already familiar, is a pretty powerful tag reader. It actually works on all sorts of media, not just MP3s with ID3 tags. TagLib# is then a .NET version of TagLib. It’s released under the LGPL, much like ZenLibrary, so packaging it and distributing it with this software is not a problem. ZenLibrary references TagLib, so when designing rules, don’t forget you have a good hunk of tagging technology to make us of. If you’re looking to do things with tags, just add a reference to “taglib-sharp.dll” as well.
Part 2 – Creating a Rule
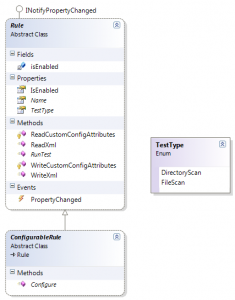
Our task today is to essentially create one of the rules/tests that make up the meat of this program. I’ve done some work to make this as easy as possible. Here is what you’ll need to do:
- Inherit from the “Rule” class
- Give the rule a name (overload the Name property)
- Define the TestType (“per-file” or “per-directory”)
- Give it some test logic
That’s it! If you want a more elaborate rule with configurations that are persisted between application sessions, there is a ConfigurableRule class to inherit from and a few more overloads you’ll need to provide. But, let’s ignore that for now. We’re going to create a very simple rule. It’s purpose will be to detect for the presence of the “discnumber” tag in all of our music files.
Set Up The Project
First order of business is getting our add-in project created. Open up Visual Studio and create a new “Class Library” project. It doesn’t really matter what you name it, but you may want to indicate your name and that it is a file with ZenLibrary Rules in it. Pretend your name is Billy Bob. You might name the project “ZenLibrary.BillyBobsRules.” I’ve named my project “SampleRuleLibray.” Once you’ve created the Class Library project, go to your references folder, right click and select “Add Reference,” click the browse tab and go find “ZenLibrary.RuleBase.dll” (it comes packaged with ZenLibrary releases). For this particular “Discnumber” tag rule, we’re also going to be using the TagLib# library as well. Once again, add a reference using “Browse” and select “taglib-sharp.dll,” which should also be in the ZenLibrary directory.
Inherit From The Rule Class
Now that we have our project set up, we can go ahead and create our rule class. Create a new class file (I called mine “SampleRule.cs”). This class should inherit from “ZenLibrary.RuleBase.Rule.”
1 2 3 4 5 6 7 8 9 | using ZenLibrary.RuleBase; namespace SampleRuleLibrary { public class SampleRule : Rule { } } |
Give The Rule A Name
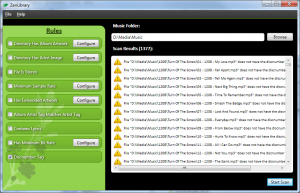
The rule needs a name. The name shows up in ZenLibrary’s rule panel on the left side and is how the user will identify your rule from the other rules. To specify a name, just override the “Name” property’s get. Pretty simple!
1 2 3 4 5 6 7 8 9 10 11 12 | using ZenLibrary.RuleBase; namespace SampleRuleLibrary { public class SampleRule : Rule { public override string Name { get { return "Discnumber Tag"; } } } } |
Define The Test Type
The test type determines if your test will be run per music directory or per file. It’s just a simple optimization effort, really. The per-directory test exists so that we don’t have to check for the existence of “folder.jpg” in the directory on every file scan. Conversely, the per-file test exists so we don’t have to rewrite logic to scan all of the files every time we run on a music directory. To define our Test Type, we override the “TestType” property’s get and specify “TestType.FileScan” for per-file and “TestType.DirectoryScan” for per-directory. Our test case is something that needs to be done a per-file basis, so we’ll use “TestType.FileScan” in the example.
1 2 3 4 5 6 7 8 9 10 11 12 13 14 15 16 17 | using ZenLibrary.RuleBase; namespace SampleRuleLibrary { public class SampleRule : Rule { public override string Name { get { return "Discnumber Tag"; } } public override TestType TestType { get { return TestType.FileScan; } } } } |
Give The Test Some Logic
Finally, the meat of the program. Our test. This is where the magic happens. The magic that you define, that is. Anything can happen here, really. Override the “RunTest()” method. You’ll be provided with either a “System.IO.FileInfo” for the file you’re scanning (on a per-file scan) or a “System.IO.DirectoryInfo” for the scanning directory (on a per-directory scan). If the scan is per-file, the DirectoryInfo parameter will be the directory where the file is. If the scan is per-directory, the FileInfo parameter will be null. From here on out, it’s up to you what to do with them. All that matters now is that you return a “RuleTestResult” at the end indicating whether the test has passed or failed. If the test has passed, mark “TestPassed” in the “RuleTestResult.IsPassed” property to true and return it. If it is has failed, mark “RuleTestResult.IsPassed” as false. Also, assign the “RuleTestResult.RuleTestFailedString.” This string is the message that will be displayed in the results box on the ZenLibrary UI. Additionally, you’ll want to specify the location where it failed by assigning “RuleTestResult.ResultPath.” This can pretty much always be the “FullName” property of the provided “DirectoryInfo.”
For the sample test case, I’ve added some logic, using TagLib#, to check whether the “Discnumber” tag is “0.” This is an indication that the “Discnumber” tag has not been assigned, and thus, fails our test.
1 2 3 4 5 6 7 8 9 10 11 12 13 14 15 16 17 18 19 20 21 22 23 24 25 26 27 28 29 30 31 32 | using ZenLibrary.RuleBase; namespace SampleRuleLibrary { public class SampleRule : Rule { public override string Name { get { return "Discnumber Tag"; } } public override TestType TestType { get { return TestType.FileScan; } } public override RuleTestResult RunTest(System.IO.DirectoryInfo directoryInfo, System.IO.FileInfo fileInfo) { TagLib.File file = TagLib.File.Create(fileInfo.FullName); RuleTestResult result = new RuleTestResult(); if (file.Tag.Disc != 0) { result.TestPassed = true; return result; } result.ResultPath = directoryInfo.FullName; result.RuleTestFailedString = string.Format("File "{0}" does not have the discnumber tag defined.", fileInfo.FullName); result.TestPassed = false; return result; } } } |
Boom! We’re done! Yep, that’s really all there is to it. Compile your Class Library and drop the output DLL in the same directory as ZenLibrary.exe. You don’t need to register it or anything. ZenLibrary will automatically detect its presence and instantiate any rules within.
If you want to see more elaborate rules with custom configuration dialogs and the likes, you can grab the source code from the subversion repository and check out the included rules in the ZenLibrary.RuleBase assembly. You may also want to check out how to write a light plug-in infrastructure via reflection by taking a look in “RuleSet.cs” to see how I instantiate all the rules without programmers having to manually register them.
You can also download the sample rule project here.
Thanks for reading!

[…] For people interested in extending it or getting their hands on the source code, be sure to check out my next post on doing just that. […]