
I feel like this article is about four years too late. All the cool kids have moved on to WPF or something really awesome, like XNA, for their graphics needs. However, there are still a lot of us playing around in the .NET 2.0 mucky muck for various reasons. Of those still doing .NET 2.0 / WinForms / GDI+ programming, I’m surprised to see how many people draw their custom controls the wrong way. Yep, I said “wrong.” I blame the majority of the C# books out there. Most of them, in the chapter on System.Drawing, just tell everyone to draw their stuff in OnPaint() or in response to a paint event. PLEASE, STOP DOING THIS. I’ll explain why.
One should not have a lot going on in one’s OnPaint method. It should be very small, very straight forward. In 95% of my custom controls, my paint event looks something like this:
1 2 3 4 5 | protected override void OnPaint(PaintEventArgs e) { if (!isDisposing && backbufferGraphics != null) backbufferGraphics.Render(e.Graphics); } |
That’s it. Just two lines. Here’s what’s going on. OnPaint is the .NET equivalent of the Win32 WM_PAINT message being raised. It happens when a region of your control is “invalidated.” Invalidation occurs when Windows thinks your control needs to be redrawn for some reason. Examples include your control being resized, another window moving in front of it, your window losing and regaining focus, etc. Because OnPaint() is called so frequently and unpredictably, it is not wise to have a lot of complex and CPU-intensive operations going on inside of it.
You may be wondering what we do instead. You be smart and efficient about it. Because the drawing logic is often complex and expensive, you’ll want to do it only as often as necessary. This means having an off-screen buffer that you draw to. When it comes time to actually paint your control on to the screen, your control can just go take a look at our off-screen buffer and copy it to the display. Pretty simple. Now, there is added complexity when you consider that you may be drawing to this buffer at the exact same time your control needs to draw it to the screen. In this scenario, your control would have to site around and wait with an invalidated region until you’ve finished drawing to your buffer. What this usually looks like to the end user is an irritating flicker on the control. The flicker they see is a rapid switch between invalidated control regions (which are usually painted pure white, black, or some other random bit of color) and the drawn buffer.
A quick look around the net will reveal that the solution to flicker is “double buffering.” Now, mind you, none of this is a new concept. People have been doing this for about as long as computer graphics have existed. The difference is, it’s a lot easier now. .NET literally makes it as easy as setting a property on your forms or controls. Beyond that, a programmer used to have to actually manage two buffers manually and swap between them. This is more automated with the introduction of the BufferedGraphics and BufferedGraphicsContext classes. Basically, you draw to the BufferedGraphics class, and it takes care of the double buffering for you. Here is an example constructor and buffer creation routine.
Constructor setting up the form’s double buffering properties:
1 2 3 4 5 6 7 8 9 10 11 12 13 14 15 16 17 | public DoubleBufferedControl() { InitializeComponent(); // Set the control style to double buffer. this.SetStyle(ControlStyles.AllPaintingInWmPaint | ControlStyles.UserPaint, true); this.SetStyle(ControlStyles.SupportsTransparentBackColor, false); this.SetStyle(ControlStyles.OptimizedDoubleBuffer, true); // Assign our buffer context. backbufferContext = BufferedGraphicsManager.Current; initializationComplete = true; RecreateBuffers(); Redraw(); } |
And here is an example of creating the buffers
1 2 3 4 5 6 7 8 9 10 11 12 13 14 15 16 17 18 19 20 21 22 23 24 25 26 27 | private void RecreateBuffers() { // Check initialization has completed so we know backbufferContext has been assigned. // Check that we aren't disposing or this could be invalid. if (!initializationComplete || isDisposing) return; // We recreate the buffer with a width and height of the control. The "+ 1" // guarantees we never have a buffer with a width or height of 0. backbufferContext.MaximumBuffer = new Size(this.Width + 1, this.Height + 1); // Dispose of old backbufferGraphics (if one has been created already) if (backbufferGraphics != null) backbufferGraphics.Dispose(); // Create new backbufferGrpahics that matches the current size of buffer. backbufferGraphics = backbufferContext.Allocate(this.CreateGraphics(), new Rectangle(0, 0, Math.Max(this.Width, 1), Math.Max(this.Height, 1))); // Assign the Graphics object on backbufferGraphics to "drawingGraphics" for easy reference elsewhere. drawingGraphics = backbufferGraphics.Graphics; // This is a good place to assign drawingGraphics.SmoothingMode if you want a better anti-aliasing technique. // Invalidate the control so a repaint gets called somewhere down the line. this.Invalidate(); } |
Now, there is one critical place where we make sure to call RecreateBuffers(). That is when the control is resized. The buffers we create in RecreateBuffers() are all sized to match the control’s size. If the buffer wasn’t the size of the control, the control would repaint with a large region of invalid graphics. So, just make sure you have a call to RecreateBuffers in OnResize for your control:
1 2 3 4 5 6 | protected override void OnResize(EventArgs e) { base.OnResize(e); RecreateBuffers(); Redraw(); } |
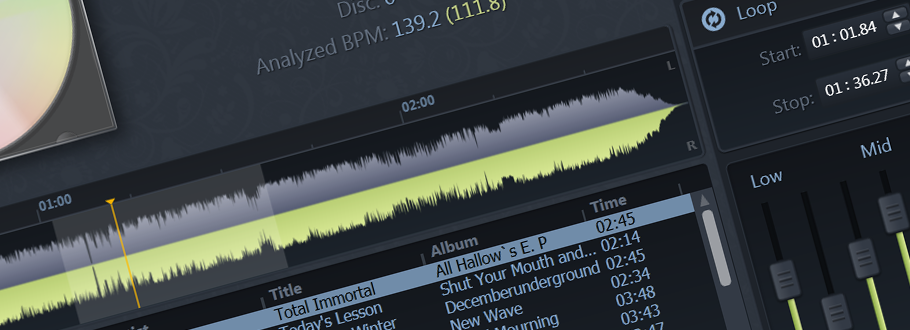
That’s pretty much all you need to get a custom double buffered control going. You may have noted that I made a few calls to “Redraw().” Redraw() is where I put my actual drawing logic. What goes in Redraw() is the meat of how you render your control. Just remember, call it only when needed. Don’t go and put the call to Redraw() in OnPaint(). That would be against everything this article tried to teach. This method of rendering is very powerful and I’ve created a number of real-time fast-rendering controls with this mechanism. I’ve been using this method for many years now, so it is tried and true. One of the first times I started double buffering on a custom control was for a custom chart and spectrogram I made for some spectrum analyzer software I was working on. Here is a screenshot:

Realtime Graph and Spectrogram
Thanks for reading. If it helps anyone, I’ve attached a very simple sample project below that contains all the code I’ve shown above. If you have any questions or comments, feel free to use the comments below.
Thanks, this is good article, I notice you have experiance in creating spectrograms using this technique, do you have any links to other code examples on how to create C# / .net spetrograms in this manner?
Unfortunately, I don’t. That spectrogram control was created fairly specifically for the piece of hardware it was designed to work with and wasn’t made following any sort of tutorial.
Very Good job. i used to my class Chart and work fine
Thanks, very good article indeed.
How would you handle graphics that update on mouse events, such as OnMouseMove? I’m creating a drag function.
Hi Jacob, I’m actually embarking on a project very similar to your realtime graph and spectrogram project (from the picture above). Is it possible if you share a portion of your code? do contact me if possible. ((:
Redraw() is now called from OnResize. But OnResize is also invoked from the message queue, the same thread – the UI thread. And the same goes for timer_Tick – it also calls Redraw(). I thought this would put less load (lengthy execution times) on handling of windows messages, or OnPaint (wm_paint) specifically. Is wm_paint a special case? What part of the puzzle am I missing?
Interesting. Visual Studio Express 2010 just crashed when I first ran my application which uses your example class “DoubleBufferedControl”. And even worst, now it keeps crashing when I open up the solution.
Any suggestions? Wonderful article tho’! Thanks 🙂
@Thomas: As you might have read, real-time fast-rendering is possible with this technique. Just hava a look at the sample project attached to the article, it is rendering the control each 5ms, if i’m not mistakin
Oww! it looks very professional. especially spectrum analyzer software. could you provide me some exemple about spectrum analyzer!
Hi Jackob 🙂 Nice article! People like me are still creating WinForms applications 🙂
Will it be possible to see some code behind that spectrum analyser?
I’m creating my master thesis right now and need to create a control that will load a binary file and create heatmap (similar to Your spectrum analyser). Your code could give me nice kick at start 🙂
Hi Jackob,
this is a very interesting tutorial. Unfortunatly the project seems to be unstable and VisualC#2010Expres crashes. How come?
This strated to happen when I resized the Dock property control to “Fill” and this beavior contiued even if I restored the property to None.
I removed also all logic coding just to understand if the reasons was in it. Nothing.
After a debug the program started to run correctly, but I didn”t do anything, neither corrections, nor adds.
I wonder if you know the reasons.
Cheers
M.